Today's the last day of t-shirt week. It's been a lot of fun, but it's time to move on.
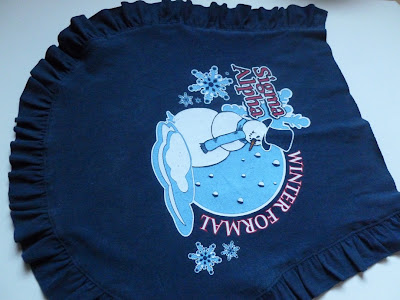
For my last project I decided to try an apron. Here's how it turned out -
Here's How I Did It:
You'll need a long sleeve tee to get enough fabric for the straps. Alternatively, you could you 2 different shirts.
Lay the shirt out with the back up. Cut the top straight across.
Draw out the curve you want for the apron skirt, and cut it out, being sure to make it symmetrical. Don't cut through the front of the shirt!
Turn the shirt over and draw another curved shape for the apron bib, with the logo where you want it. Cut it out also, making sure the sides are symmetrical.
Cut the remainder of the shirt into 2" strips for the ruffle. 4 should be plenty, depending on the size of the skirt and how full you want the ruffle.
Cut off the sleeves and cuffs. Cut the sleeves into 4" strips for the straps. You will need 5.
To make the bib a little stiffer, I traced my bib onto the leftover from a different t-shirt and cut that out as well.
Sew the 2" strips end to end, to make one long strip. Trim all the seam allowances very close to the stitch line. Put a line of gathering stitch along one side. (On most machines, if you turn the tension all the way up it will automatically gather the fabric as you sew.)
Pin and sew the ruffle all the way around the curved edges of your apron skirt. Press the seam allowance toward the skirt and topstitch all the way around.
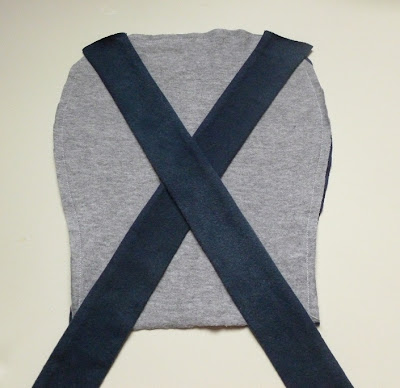
For the straps: Sew 3 4" strips end to end to make the long waist strap.
Fold the other 2 4" strips lengthwise and sew right along the edge.
Turn right side out and press.
Fold the long 4" strip in half lengthwise also, and sew it closed, leaving a small opening in the middle for turning. Turn it right side out and press.
Lay the back bib piece right side up, and place the shorter straps with the open ends up, along the seam line in the top corners. Lay the front bib piece right side down on top, matching all the edges. Sew around the outside, leaving the straight side open for turning.
Turn it right side out and press.
Topstitch all the way around the bib.
Mark the center of the bib, skirt, and long strap with a pin.
Pin all three together, matching the centers. Have the raw edges of the bib and skirt overlapped behind the waistband.
Sew a double line of stitching along the edges of the waistband, firmly attaching the skirt and bib, and sewing over the little space you left open to turn the waistband.
Go put it on!
Friday, July 27, 2012
Thursday, July 26, 2012
Day Four
I really like the way today's project came out. That's the great thing about t-shirts. With such a stack to work with, I don't really care if something turns out or not, so I can try some really fun things.
For Day Four of "t-shirt week", I made this long sleeve tee into a ruffled vest.
It was much simpler than it looks.
First, try the shirt on a dummy (or a friend!) and mark where you want the new side seams to be. You want a very curvy line. For mine, I also reversed the shirt, front to back, so I put in new shoulder seams as well.
Now, lay the shirt flat and cut your new side seams and cut off the sleeves, being sure to cut both sides the same. Also cut a line straight up the middle of the front. Trace a line, curving from the neckline down to the side seam and cut along that too.
Fold the back piece in half and make sure the sides are symmetrical. Trim off the collar and a gently rounded curve at the bottom hem.
Place the two front pieces together, and do the same - make sure the sides are the same, cut off the collar, rounding it into your curve, and copy the front curve onto the other side.
Sew up the sides (and the new shoulders, if you cut them too.) and trim the bottom curve to be sure it flows smoothly. Now would also be a good time to try it on again and be sure the arm holes are okay.
Cut the sleeves into 2" strips and sew them together, end to end.
Trim the seam allowances close to the seam lines.
Ruffle and 2" strip and attach them all around the front, across the back, and around the neckline.
Go wear it!
Or try it with a belt. I like it both ways...
Wednesday, July 25, 2012
T-shirts, Take Three
Today's project is a little more interesting - logo panties!
It's so much fun! Want to play?
Start by making a pattern from a pair of panties the size you want. Stretch the elastic out to get an accurate size and trace it onto a piece of paper. Leave a 1/4" along the sides for a seam allowance. Don't forget a piece for the lining in the crotch. (If the t-shirt you are using is a fairly heavy one, you may want to add some size all the way around, as it will not stretch as much as most underwear knits.)
Lay your pattern pieces over the logo, centering the design, and cut it out. (I had to do mine in 2 pieces to center the design, but I just added a little for the seam and sewed them together.)
Pin back to front at the sides and bottom. Pin the lining piece along the bottom too.
Sew the seams. Don't forget to use a knit needle and stretch stitch.
Trim any places where the edges don't quite meet up at the seams.
Pin the lining to the front at the top.
This step is optional -- Overcast the edges in a contrast color to give the appearance of lace. Or add lace! Whatever you want...
With an elastic bobbin, sew along all the outside edges. I ran 2 rows of shirring around the top edge for a little more elasticity. I also tried using baby elastic along the edges, but the shirring was easier. We'll see which one holds up better.
That's all!
Subscribe to:
Comments (Atom)


