Showing posts with label skirts. Show all posts

Monday, June 4, 2012

Moonlit roses


Last year I drew up some sketches of several skirts I was going to make for myself.  Someday.  Well, with one thing and another, it hasn't really happened, but then I had the chance to go fabric shopping WITHOUT CHILDREN and happily spent nearly 2 hours choosing just the right materials for a skirt.

So, over the next several weeks I messed around with my design a bit - drafting a pattern and even cutting some of the material.  But that was about as far as it went.

Then I saw that one of my favorite crafty blogs was having a "skirt week"and I decided to enter this skirt!  Which meant I had about 3 days to make it into reality.  Or throw the whole thing away.  Here's the finished product (modeled by a sweet friend).


I wanted something slim, with a high waist, having seen a photo from the '40s that I loved.  I also wanted to add a touch of softness and "flow" to what can otherwise be a rather severe line, so I decided to add a gathered chiffon pleat inside of the slit. 
 Here it is the first concept stage

and with the chiffon pleat added


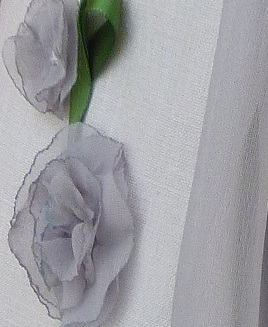
Then I put on a few flowers and such. (I'll be adding a tutorial soon on how to make the gathered chiffon flowers
 pinning the embellishments in place

After that it was just a matter of sewing everything down, attaching the lining at the waist (that took a whole day to figure out, with the chiffon insert and no waistband!) and putting in the zipper and hem.  They are actually just basted in, since I am guessing at the size.


I think it came out fairly faithful to the original idea.  I had to give up on the peach color I had in mind, since I couldn't find a fabric I liked in the right shade.  But I'm really in love with the gray.


Drafting a non-maternity pattern just now was definitely a bit of a challenge.  I usually can try my "draft" on to see how it fits as a I go.  That was impossible right now, since I am nowhere close to the proportions I will be this time next year!  Cordelia's not really either, since she's still the size I was before child  #1.  Thanks to the help of another sweet and very patient friend, I got it figured out!


And I love it.  We'll see if I love it as much when I can actually wear it.


But for now, I will just enjoy the satisfaction of designing.

Friday, September 23, 2011

"Scrap pile rescue!" project

My husband is hard on jeans.  I don't know how, but he can wear the knees out of a pair of pants faster than most men can walk through a hardware store.  (His son seems to be walking in the very same paths.)  Anyway, I patch and re-patch the knees, but eventually he starts to develop "leaks" in some strategic places, and I do not patch "inseams" or backsides.  So then I cut the backs out of the legs and save them for patches for the next pair, and throw the rest out.
This time I decided there must be something else I could do.  Nothing ventured, nothing gained, right?  And nothing lost either, if it doesn't work out, since I was going to scrap them anyway.


So here's what I came up with yesterday: 
 

Want to try it yourself?
Old Jeans to Jean Skirt Refashion

Start with an old pair of jeans.  
Step 1.  Cut them off below the back pockets, where the legs come together.  This becomes the skirt top.

Optional Step.  If you're using your husband's jeans and you're lucky enough to need to take them in, simply turn it inside out and sew up the side seam to the inside of the original stitching.  You may need to remove a belt loop from the waistband.
Sew here.

Step 2.  Here is where the math comes in --
Measure along the edge you cut.  Add 40" for the box pleats; this allows for 4 2" pleats and 2 1" pleats.  (If you don't have enough leg material to make a strip that long, than try doing all 1" pleats, which means you need the measurement of the hem plus 24".)

Step 3.  Now, cut the backs out of the legs.  You can cut the fronts too if they're still any good.  I was able to salvage about 10 inches off the bottom of the leg fronts. Trim all these strips to a uniform width. Sew them together (don't forget to overcast the edges) to form a loop the length of your measurement from Step 2.  This becomes the skirt.

Step 4.  Cut 2" strips of a coordinating fabric and sew them together to form a strip about 12"-18"  longer than your measurement from Step 2.

Step 5. Iron over 1/2" along each side, then fold it in half and iron again.  This forms the binding for the hem and pockets.

Step 6.  Topstitch this binding along the bottom edge of your skirt.

Step 7.  Now, fold the skirt in half, then in half again and mark the folds.  Open it up and measure 4" out from each side of your 1st set of markings and mark again.  Fold the 2nd set of marks in to the first set to form your box pleats.  Make another mark halfway between two pleats.  Mark 2" to either side of this, and make another pleat.  Do the same in the back.  (Note:  If you only added 24" for the skirt, use 2" instead of 4" on all your pleats.)

You should now have 6 box pleats, with the ones directly in the front and back a little bit smaller.

Step 8.  Baste across all these pleats and sew your skirt to the skirt top, right sides together.  Open and press the seam allowance up toward the skirt top.

Step 9.  Make two rows of topstitching along this seam.

Step 10.  Finish it off by covering the edges of the pockets with your remaining binding.  (Mine were looking really torn and ragged anyway)  Patch any holes with your coordinating fabric.

Step 11.  Put it on and enjoy it!
Yes, my three-year-old took these pictures for me.

I hope that makes sense.  Sorry I don't have more pictures.  I wanted to finish before the girls woke up and I can only count on an hour for nap time. 


So, I'm pretty happy with the way this turned out.   Fortunately I am assured of an unending supply of old jeans around here, because I keep thinking of all the things I can do with them...