Showing posts with label maternity. Show all posts

Friday, June 15, 2012

New project, Part II

Did you guess what my project was? 

 That's right, I turned a button down men's shirt into a maternity shirt!  Someone gave Steve an nice button down shirt, but the neck was too small for him, so I re-purposed it for myself.

 He has too many shirts anyway.

It's a fairly quick and simple project, and super comfy to wear.  It would look good on a non-maternity figure also.  Want to make one too?

 Start with a button down shirt.  If it's large enough, you could even call this a dress!  (This is a great use for those shirt with a stained collar)

 Lay it out flat and cut it across the top, just under the collar, from sleeve to sleeve, then straight down to the hem.  Cut through both front and back.

 If it has a pocket, take that off too.

Now, put the front and back right sides together, and sew and overcast your new side seams, top to bottom.
it should look like this

Next, press under 1/2" along the top edge.  You may have to remove a button, but just pin the button placket closed to keep it in place.

Sew three lines of shirring along the top, 1/4" from the folded edge.  Each line should be about 1/8" apart.  Sew right across that button placket, since you won't be using that anymore.  Actually, I sewed the whole placket closed from about the middle of the shirt up to the top, so it wouldn't gap across the chest.

Now, put the shirt on and mark the waist (or right under your bust if you don't have a waist right now!)  It helps to tie something around until it looks right and then mark it with chalk.

Run 5 lines of shirring, about 1/8" apart, around the waist, front and back. 

It's time to do the sleeves.  
Lay the top out with the side seams in the middle.  Cut a half circle out about 3" deep and 6" across.  If you're not really sure about this part, put a shirt that fits you over your project and trace the arm hole.

Lay out the sleeves that you cut off earlier, with the seam at the bottom.  I wanted the buttons to go in the front, but you could put them in the back too.  Cut a sleeve curve.  It should look about like this, don't worry about being too exact.  The top of the curve should be about 16" above the cuff.  The underarm seam should be at the bottom of the curve.
 BE SURE YOU CUT THE OTHER SLEEVE LIKE A MIRROR IMAGE.  If you cut them both alike, you'll end up with one upside down.


 Pin the sleeves to the armholes, matching the underarm seams.  Sew, using a 1/2" seam allowance, and overcast.

Press under 1/2" along the rest of the sleeve end. 

Run 3 lines of shirring along the pressed edge, trying to match the sleeve shirring with the lines of shirring on the top of the bodice.

 Try it on and show it off!


 Here's a variation I thought about, but ran out of time for -- cut the cuff off at the placket and use the extras from the sleeves to add a little ruffle
mine's just pinned and folded, to see how it looked.


Monday, June 11, 2012

attitude adjustment

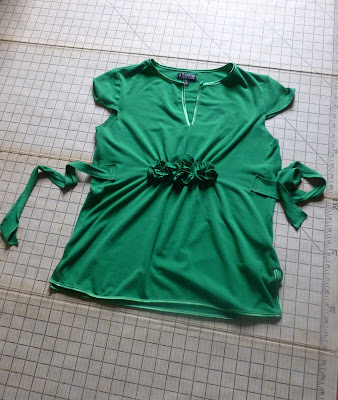
I had recently been given a maternity shirt.  I liked the color and the material, but with the temperatures in the 80s and 90s, wanted something a bit more fun and summery.  Not to mention short sleeves.  So this weekend I gave it a little face lift.

Here's the new look:


If you have a long sleeve shirt of your own that you would like to dress up a bit?
Follow along!

 First, take any long sleeve top that's big enough to cover your belly.

 Cut off the sleeves.  Don't forget to save them for a little later!


 Now, fold under the raw edge of the new sleeve and armhole and topstitch in place.  Be sure to use a knit needle.  You may also want to take the side in a little under the arm, to keep it from gaping.

Put on the shirt and mark the "waistline" just under the bust.  Also, mark about where you want the gathers to end (pins).  After you take the shirt off, make sure everything is symmetrical (chalk marks).

Sew 5 lines of shirring along the "waistline" from end mark to end mark, 1/8" apart. 

Your shirt should now look something like this.


Here's where we go back to the sleeves.
Cut one open along the seam line and lay it flat.  Cut it in to pieces as shown:


I used a fabric pen and traced the top and bottom of a cup and a baby food jar. 

Fold under the long edges of each 2" strip and topstitch.  Set them aside.


FLOWERS:
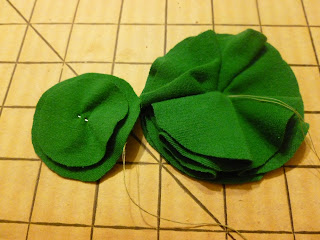
Start with 5 medium circles.  Bring a needle a thread up thru the center of one. 
Catch a few little folds in the center of the next circle and sew it down, folding the gathers so it covers about 1/3 of the bottom circle.


Repeat with another circle.


And another. 

Sew the last circle on the top of the others.  Stitch everything down so you have a nice, even, ruffly looking flower.

Repeat with another 5 medium circles to make the second flower.

For the center flower, sew the four large circles together as above, but instead of sewing a fifth large circle on top, layer the medium and small circle together and sew them on.


Arrange your flowers on top of the shirring and sew them down.  Pin the 2"strips in place about 1 1/2" to the front of the side seams, even with the shirring.  Sew them down.


Go show it off!


Wednesday, August 10, 2011

Petal maternity shirt

A couple friends of mine were taking another friend out for her birthday one evening, so about lunchtime I started thinking about what I could give my (expecting!) friend for her birthday. Feeling inspired by this "crafterhours" post, I stuck the kids in bed for naptime, dug through my bag of maternity clothes, and pulled out this:

This maternity tank was a very stretched out medium -- I hadn't worn it in my last 2 pregnancies because it was so big and the straps were all stretched out, but the fabric was still good and I loved the color, so I had kept it.


Well, a quick rummage through the scrap bin and an hour later, it was the perfect gift--
Yes, that lumpy "pregnant belly" on Cordelia is a pillow tied on


And, since everything is adjustable, it can still work after she's not pregnant anymore!


How I did it: First, I cut off the stretched-out straps, then folded over about an inch along the top edges and sewed them down to make a casing for the ribbon I threaded through and tied at the shoulder. Then I cut a tiny slit in the bottom hem (on the inside) and threaded a piece of narrow elastic through that to gather the bottom.
To make the flowers, I cut out the "shelf bra" from inside the tank top, fused the two pieces together with "wunder under" and cut out little flowers; just like the "crafterhours" tutorial. I pinned them where I wanted them, sewed them down, and was done!