 One of my favorite, most used items in the diaper bag is my wet bag. I use it all the time, not just for dirty diapers or potty training accidents, but for those times they spill juice ALL OVER themselves, for muddy/wet clothes after a playdate, for swimsuits - pretty much any mess they can make while we're out somewhere!
In my opinion, everyone should have a wet bag.
What is a wet bag, you ask? Well, the original idea is for a water-proof bag for those cloth diapering mommies to have something to put the dirty diapers in while you're out and about. But like I said, it has SO many more uses! And it's way cuter than a plastic walmart bag.
Fortunately, they're pretty quick and simple to make! Actually, it's my "go to" gift for baby showers; since I always have the supplies I need on hand, I can whip one out the night before (no, we never procrastinate around here...)
Want to try one? Follow along!
Supplies list:

13 1/2" x 32" piece of PUL (polyurethene laminate material - you can find it just about anywhere now, often along with other cloth diaper making supplies. You can also get some really cute designs now, so could even skip the cloth cover)
13 1/2" x 32" piece of lightweight cloth
1 12" zipper
12" -14" ribbon
1 1/2" x 5" piece of fleece
thread
First, pin the decorative fabric over the PUL, with waterproof side of the PUL facing down, and the right side of the outer fabric facing up


Now, run a line of stitching 1/2" from the edge along the shorter ends of the rectangle, and then overcast the edge.

Fold it to the inside along the line of stitching sew that down (PUL tends to shift a lot, so it really helps to get the zipper in nicely if you first sew it down)

Attach one side of the zipper with the teeth along the fold. Line up the top of the zipper tape with one corner. The bottom should come a little short of the other corner - that's good.


Zip the zipper closed, line up the other side so the folded edges are just touching, and sew the other side of the zipper.

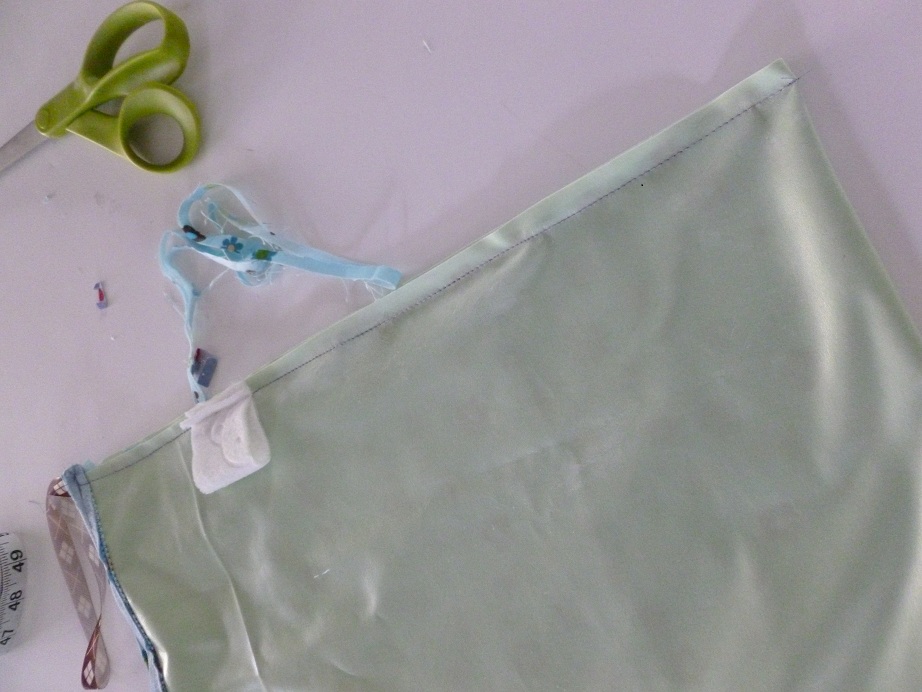
Now, open up the zipper and turn the bag right sides together. Pin along both long edges. Fold your little piece of fleece in half and put it along one side so the open edges will be caught in the seam. This little tab will be for scenting with your favorite essential oil to keep things smelling nice.

The next step is to sew the side seams at 1/2". Hint - to keep PUL from clinging to your presser foot and bunching up as you go, try sprinkling a little bit of baby powder right along the seam line. This keeps everything gliding along smoothly.


Just about done! Now you'll want to trim the fabric (not the PUL) along the seam, so it is completely covered by the PUL, and overcast the edge. This keeps the outer fabric from coming in contact with anything wet and wicking moisture to the outside of your bag. (If you are using a patterned PUL and not an outer cover, just skip this step! PUL doesn't fray.)

To finish, we just need to add the ribbon loop handle. Turn the bag to the right side. There should be a little gap between the end of your zipper and the side seam. Stick the ends of your ribbon in there and sew that gap shut. Reinforce that stitching several times to make the handle nice and sturdy.
(Sorry, forgot the photo for this!)

This weekend I made another one, using an idea from Make It and Love It. My brother and his wife are expecting a little boy this fall, and I thought this would make an adorable wet bag for a little man. What do you think?


The 13 best casinos in Las Vegas - MapYRO
ReplyDeleteThe casinos in Las 울산광역 출장샵 Vegas are: Harrah's Palace, Caesars Palace, 경기도 출장마사지 and Wynn. Other · 동두천 출장샵 MGM Grand Hotel 경산 출장샵 and Casino; The 동두천 출장마사지 Mirage Hotel and Casino.