Wednesday, September 28, 2011

Halloween Costumes

I don't know how you feel about Halloween and trick-or-treating, but you have to admit that it's a lot of fun to dress up!  And when you have a family of 5 (7 if you count the dogs!) there's even more options.  We have had a lot of fun the last couple of years with our costumes.  Two years ago JL was a cowboy and our dog Piper was his "cow pony", complete with saddle and bridle.  A (at 2 months old!) was a pea pod, which didn't fit in the theme, but was the best I could do. (Sorry about the terrible photos, I forgot all about pictures until it was almost dark.  And raining.)

  Last year I wanted to do "Wizard of Oz".  I had a vague idea of what I wanted, but during the final part of my pregnancy (the last 5 months!) was too sick to care about anything other than basic necessities of life.  A couple of days after J was born I decided I did want to do something after all.  Which gave me 2 days to pull it together.  Fortunately my mother was staying with us, and I was able to explain what I wanted and she did a lot of it.  I made Dorothy's dress, but my midwife came by for my follow-up visit just as I was finishing, gave me a scolding, and sent me back to bed.  Where I finished Scarecrow's pants by hand, and cut out Lion's tail.
Here is what we came up with:

JL is our Scarecrow
A our Dorothy
 
and J, at 5 days old, was the littlest Lion ever. 
 
Wooster joined in the fun as Toto,
and Steve was a good natured Tin Man.  

So the questions is now:
What do we do this year?

I'd like to start something a little bit earlier this year, especially since I won't have Mom, but I'm drawing a blank on ideas!  Does anyone have any suggestions?

Friday, September 23, 2011

"Scrap pile rescue!" project

My husband is hard on jeans.  I don't know how, but he can wear the knees out of a pair of pants faster than most men can walk through a hardware store.  (His son seems to be walking in the very same paths.)  Anyway, I patch and re-patch the knees, but eventually he starts to develop "leaks" in some strategic places, and I do not patch "inseams" or backsides.  So then I cut the backs out of the legs and save them for patches for the next pair, and throw the rest out.
This time I decided there must be something else I could do.  Nothing ventured, nothing gained, right?  And nothing lost either, if it doesn't work out, since I was going to scrap them anyway.


So here's what I came up with yesterday: 
 

Want to try it yourself?
Old Jeans to Jean Skirt Refashion

Start with an old pair of jeans.  
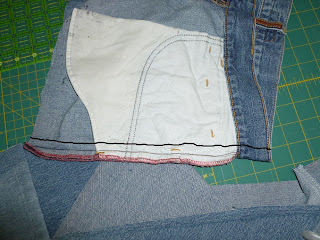
Step 1.  Cut them off below the back pockets, where the legs come together.  This becomes the skirt top.

Optional Step.  If you're using your husband's jeans and you're lucky enough to need to take them in, simply turn it inside out and sew up the side seam to the inside of the original stitching.  You may need to remove a belt loop from the waistband.
Sew here.

Step 2.  Here is where the math comes in --
Measure along the edge you cut.  Add 40" for the box pleats; this allows for 4 2" pleats and 2 1" pleats.  (If you don't have enough leg material to make a strip that long, than try doing all 1" pleats, which means you need the measurement of the hem plus 24".)

Step 3.  Now, cut the backs out of the legs.  You can cut the fronts too if they're still any good.  I was able to salvage about 10 inches off the bottom of the leg fronts. Trim all these strips to a uniform width. Sew them together (don't forget to overcast the edges) to form a loop the length of your measurement from Step 2.  This becomes the skirt.

Step 4.  Cut 2" strips of a coordinating fabric and sew them together to form a strip about 12"-18"  longer than your measurement from Step 2.

Step 5. Iron over 1/2" along each side, then fold it in half and iron again.  This forms the binding for the hem and pockets.

Step 6.  Topstitch this binding along the bottom edge of your skirt.

Step 7.  Now, fold the skirt in half, then in half again and mark the folds.  Open it up and measure 4" out from each side of your 1st set of markings and mark again.  Fold the 2nd set of marks in to the first set to form your box pleats.  Make another mark halfway between two pleats.  Mark 2" to either side of this, and make another pleat.  Do the same in the back.  (Note:  If you only added 24" for the skirt, use 2" instead of 4" on all your pleats.)

You should now have 6 box pleats, with the ones directly in the front and back a little bit smaller.

Step 8.  Baste across all these pleats and sew your skirt to the skirt top, right sides together.  Open and press the seam allowance up toward the skirt top.

Step 9.  Make two rows of topstitching along this seam.

Step 10.  Finish it off by covering the edges of the pockets with your remaining binding.  (Mine were looking really torn and ragged anyway)  Patch any holes with your coordinating fabric.

Step 11.  Put it on and enjoy it!
Yes, my three-year-old took these pictures for me.

I hope that makes sense.  Sorry I don't have more pictures.  I wanted to finish before the girls woke up and I can only count on an hour for nap time. 


So, I'm pretty happy with the way this turned out.   Fortunately I am assured of an unending supply of old jeans around here, because I keep thinking of all the things I can do with them...

Wednesday, September 21, 2011

Craft Corner

I have been dreaming about a craft room for years.  We keep talking about "when we get a bigger house.." but actually looking for something keeps getting pushed back and pushed back, for various reasons.  We really do love our little 1920 farmhouse, it's just so tiny with 3 kids now, and there is NO storage!
For the last couple years I've been doing all my sewing at the kitchen table, which means all my tools, and the machine, and everything has to be gotten out when I want to work, and all put back away before I can get out the next meal.  It wasn't so bad when it was just Steve and I, and we could eat in the living room whenever I was involved in a project, but with 3 kids needing 3 meals and 2 snacks everyday, this becomes tedious very quickly.
Well, when I started thinking about another year or two using the kitchen table and daydreaming about a craft room, I decided something had to change now!  So, while Steve was gone last week I did a little rearranging, and here is what I came up with:
My new "craft corner"
I shared a little bit about it last week in this post, but I'm so excited that I want to talk about it some more!

Here's what I did: I moved the table and hutch in my kitchen to make this space for this little desk, and put up a big cork board to hang all my project ideas and sketches, photos or fabrics that inspire me, (JL's artwork) etc.  Now instead of notebooks overflowing with scraps and pieces, I have it all out on the board where I can see it!
I bought a 5 drawer organizer for all my little gadgets and things, and filled the desk drawers with other bits and pieces of my stash.  Now instead of trying to keep all my things in boxes that I had to dig through all the time, it's all right at my finger tips!
 

All this, and my sewing machine always available too! Now a 15 minute project really takes 15 minutes, instead of an hour: 20 to get everything out, 15 to do it, and 20 to clean it all up again.  I can't wait to show you all the projects I'm working on now that sewing is so easy and fun again!  I still use the kitchen table for cutting and laying out, and all that still has to be moved for every meal, but it's a lot better than it was!

  "Nice," you are thinking, "but it looks awful cluttered having all that mess out all the time."   I thought of that too, which is probably the biggest reason I haven't done this before.  But I came up with something that I think will work.  I painted the back side of the cork board with chalkboard paint.  Now when we have a big group of people over (like this brunch we hosted last weekend), I just flip the cork board around to hide all those messy scraps, move the sewing machine and organizer into JL's room, stick all the other bits into the drawers, and I have a nice sideboard for food and a board to write "Welcome" or the menu, or anything that strikes my fancy. 
(There's nothing written on it here because the paint still hadn't cured enough to use it!)
So actually, I feel like I have more room in the kitchen now!

Have I mentioned how excited I am?  It's not the craft room of my dreams, but it's great for the time being!  Now if only we could figure out where to put all the kid's clothes...

What about you?  Do you have the ideal craft room?  Or do you have to work in a tiny space too?  How do you handle it?  I'd love to see ideas for small spaces, as well as pictures of those great big gorgeous sewing rooms I know some people have!  It gives me things to daydream about...

Monday, September 19, 2011

Little girl's fall outfit tutorial

Here's the tutorial I promised in my last post!
1) Start with an old sweater that you never wear anymore.  To make the vest you'll need one with a large neck, one that buttons up the side is best.

2) Cut off the arms.  These will be your leg warmers.


3) Wrap a piece of 1/4" elastic around your little one's leg just above the knee, stretching is just a tiny bit, and overlapping the ends by 1".  Cut another piece the same length.  Sew these with a zig-zag stitch, forming 2 loops.

4) Turn the sleeve wrong-side out.  Place the elastic loop around the sleeve, 1" down from the cut edge.  Fold the cut end down over the elastic loop and pin it in place.  Sew down with a zig-zag stitch, 3/4" from the folded edge.
5) Repeat with the second sleeve and elastic loop. 

Two cute leg warmers!


 Now, for the vest:
1)  Fold the sweater so the "arms" (now just holes!) are directly in the middle and the shoulder seams run straight down the middle.  Be sure both shoulder seams are even and directly down the middle.  The button side of the collar becomes the center front.  Cut a gentle curve just under the armhole. Cut up the sides.
 Here's what mine looked like after I cut it. You can tell I wasn't too worried about perfection!  You can even that edge up after you make your initial cut.
2) Sew the sides, right sides together, using a stretch stitch.  Turn it right side out again.
3) Turn under 1" all along the bottom and pin it in place.

4) Topstitch in place with a zig-zag.  You now have a tube, slightly bell shaped.  (Again, I wasn't too worried about perfection!)
5) Cut a 3" slit in the each side where you want the arm holes.  I slid mine over A's head and marked her shoulders.  (This can be awfully hard to do with a squirmy toddler!  Try bribery.)  I made mine 5" from the top, so the collar would fold over.  You may not need to finish this cut, depending on your sweater.  If yours is unraveling, zig-zag the edge.  This will give it a more "ruffled look", so you might want to do it anyway.

A cozy little vest!


Now, we can't waste the rest of this sweater!  So let's make a hat.

1) Cut an 8" piece off the bottom from side seam to side seam.

2) Fold this piece in half and round the top corners.
3) Pin and sew.
4)  Now, fold the hat in half again, with the side seams together down the new middle.  Cut the little peak off the top, perpendicular to your first seam.

5) Pin and sew.

 We still have some pieces of the original sweater left.  Now for some fancy bits!

To make a headband --
1) Cut a 1 1/2" strip off the bottom.  Wrap this around your little one's head and mark the length you need. 
.

2) Pin and sew

3) Cut various size circles out of the remaining sweater pieces.  Chalk works really well to mark bulky knits!  Go ahead and cut as many as will fit -- you can always use another flower accessory!

4) Overcast the edges of the circles.  This will give them a "ruffley" look.

5) Layer the circles together, starting with your largest on bottom.

6) Sew through all the layers to make your flower.

7) Glue a bar pin on the back.

8) Add some pizazz!

Here's one with a little bling


Various buttons from my vintage button collection


Now, pin the flowers on the headband, the hat, the vest, the legwarmers... anything you want!


Here's what was left of my sweater when I got finished!