Full Skirted Apron
For this tutorial I made a child-sized apron. If you wish to make an adult-sized one, use the adult measurements (below) but all the steps will be the same.You will need about 1 1/2 yards of a sturdy, washable material. Cottons or cotton blends work well. If you want a contrasting bib and skirt, you'll need 1 yd for the skirt and 1/2 yd for the bib. Remember to pre-wash your material!
Start by cutting your pieces.
Skirt:
Cut 1 piece 30" x 15" child
or
42" x 21" adult
 Skirt ties:
Cut 2 pieces 3" x 30" child
or
3.5" x 36" adult
Bib:
Cut 2 pieces 9" x 9" child
or
12" x 12" adult
 Bib ties:
Cut 2 pieces 3" x 20" child
or
3.5" x 24" adult
To make the bib:
First, press under 1/2" along both long sides and one short edge of both the bib ties.Clip the corners.
Now, fold the ties in half, matching the long sides. Press and pin.
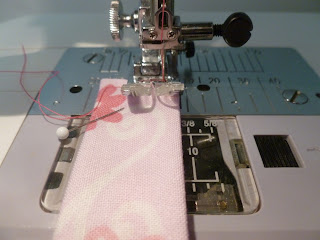
Starting at the corner of the short edge, topstitch 1/8" away from the folded edge. When you get to the corner, put your needle in the fabric, lift the presser foot and turn the strap to the long edge. Set the presser foot back down and continue sewing to the end.
Repeat for the second tie.
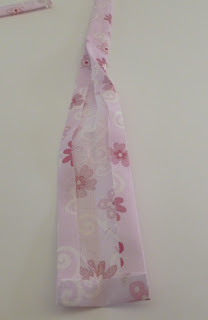
Your finished ties should look like this:
Now, place one 9" x 9" bib piece right side up on your table. Pin the straps to the upper edge 3/4" from the side, matching the unfinished edge of the straps to the top edge of the bib.
Now place the second 9" x 9" square, right side down, on top of the first, matching all the edges. Pin the sides and top, leaving the bottom edge (with the tie ends sticking out) open.
Sew along the pinned edges, leave a 5/8" seam allowance. Turn the corners by placing your needle in the fabric and lifting the presser foot, just like we did with the ties. Be careful not to catch the loose ends of the ties in your seam.
Clip the corners, being careful not to cut through the stitching, press, and turn.
Press again on the right side. To be sure the seam is all the way open, try pinching it and gently "rubbing" it between your fingers as you press.
That's it for the bib!
To make the skirt:
We'll start by making a wide hem along the bottom and narrow hems along the two edges.
Press under 1/2" along one long edge and both shorter edges of the skirt piece.
Now, turn it over again 1/2" on both shorter ends, hiding the raw edge.
Turn over 1" along the bottom, hiding that raw edge also.
Pin the hems in place, clipping the corners if necessary to hide any raw ends.
Topstitch 1/8" from the folded edge, turning the fabric at the corners like before.
Sew, using a 5/8" seam allowance, and press open. This will give you one long waistband piece.
Run two lines of gathering stitches (the longest stitch setting on your machine) along the top, unfinished edge, of the skirt. One line should be at 3/8" and one at 6/8". This double line of stitching makes a much neater, more even gather than a single line would. Don't backstitch.
Now you'll need to attach the skirt to the waistband and begin to draw the gathers in.
First, mark 6" on either side of the center seam of your waistband. (Note: for the adult size apron, mark 10" on either side of the center seam) Mark the center of the skirt as well.
Now, pin the skirt to the waistband, right sides together, matching the centers and matching the skirt edges to the 6" markings on the waistband. The raw edges should be even.
Gently draw the gathers in, pulling the bobbin threads of both lines of stitching at the same time, until the skirt lays flat against the waistband.
Pin in place. Place your pins very close together - gathers have a way of shifting while you sew!
Sew in place, using a 5/8" seam allowance. Don't forget to set your stitch length back to normal.
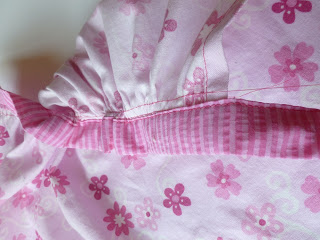
It should look like this when you are finished:
Now, press the seam allowance toward the waistband, and continue pressing under 5/8" along the rest of the waistband strap, both the edge to which you attached the skirt, the other long edge, and both short ends.
Fold the waistband in half, matching the edge to the seam line across the skirt. Press and pin.
Topstitch 1/8" from the lower folded edge along the entire length of the waistband straps,
You will see that the lower line of gathering stitches is still visible under the edge of the waistband. Go ahead and remove these now.
Attaching the bib and skirt:
Mark the center of the raw edge of the bib.
Pin the bib and skirt together so that the raw edge of the bib is even with the top of the waistband, wrong sides together, matching the centers.
Sew, leaving a 5/8" seam allowance. Trim the bib seam allowance close to the line of stitching.
Now, fold the bib up, covering the raw edge you just trimmed, and pin it in place.
Topstitch this in place, 1/8" from the top edge of the waistband.
right side
wrong side
Finished!


No comments:
Post a Comment