First, a quick overview of the machine parts:


backstitch button: makes the machine sew backwards to lock your stitches in place (use at the start and stop of seams)
handwheel: allows you to control the movement of the needle manually
stitch width control: sets the width of stitches like a zigzag
stitch length control: set the length of stitches -- about 2.5-3.0 is standard for a normal seam, 5.0 (or as long as possible) is a basting or gathering stitch
stitch type: sets the kind of stitch your machine will sew
arm: piece that sticks out under the needle
thread guide: guides the thread
tension control dial: used to control the balance between the upper thread and the bobbin thread
spool pin and holder: holds the thread spool in place
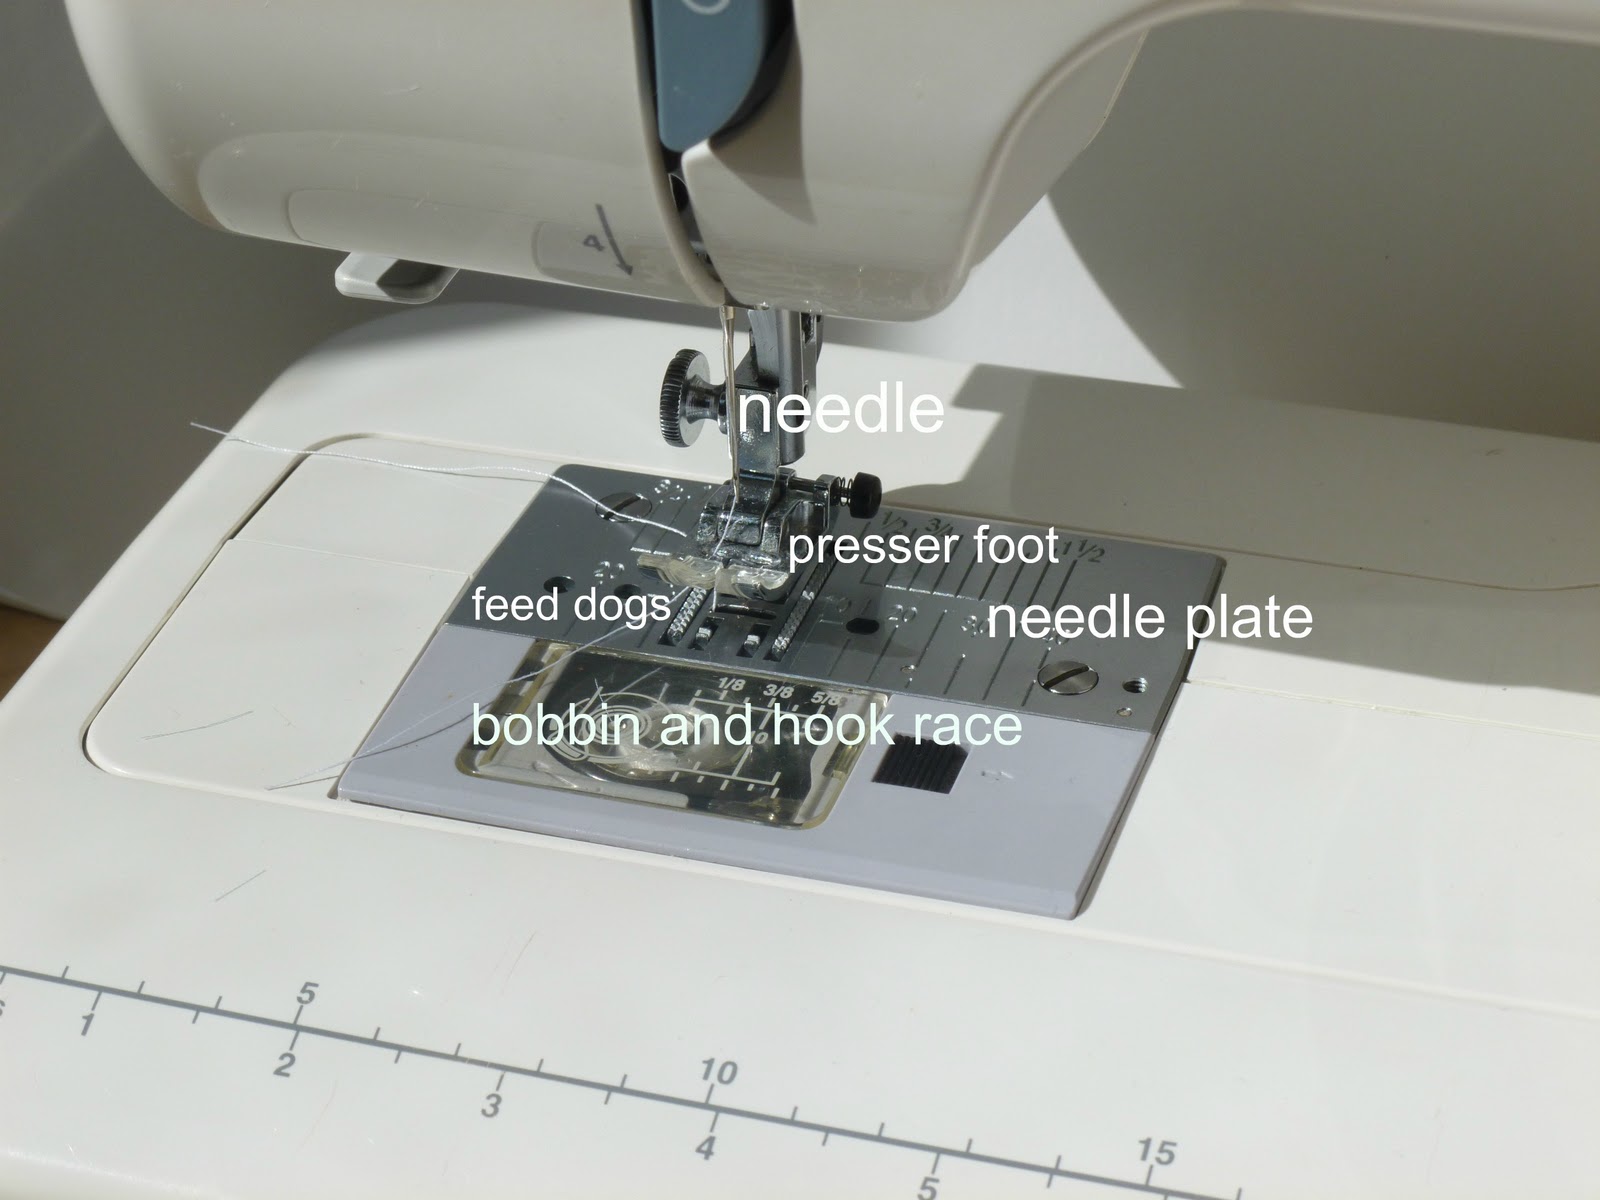
needle: this is what moves the thread through the fabric
presser foot: this piece is lifted up to slide the fabric under, then set down to hold the fabric in place while sewing.
feed dogs: move the fabric through when sewing to control stitch length
needle plate: covers the inner workings of the machine and has markings for different seam allowances
bobbin: holds the "underneath" thread and fits into the ...
hookrace: brings the bobbin thread around and attaches it to the upper thread
Threading the machine is fairly simple, it just takes a little practice! All machines have a basic thread pattern, although each machine looks a little different.


First, place the spool of thread on the spool pin. Run the thread along the thread guide or guides.
Next, take the thread down under the thread guide plate and back up to the top, right to left.

 Now around the thread take up lever, right to left.
And down along the thread guide on the needle bar and through the eye of the needle.
Now let's try winding and threading a bobbin. (These instructions are fairly standard for a drop-in bobbin.)


First, run the thread around the bobbin winding guides.
Then pass the end of the thread up through the hole in the bobbin and place the bobbin on the bobbin winding pin.
Holding on to that "tail", snap the winding pin over and press on the foot pedal. The bobbin should wind right up and stop when it is full.
Cut the "tail" off, flush with the bobbin, and cut the thread to between the bobbin and the large spool.


Take the bobbin off the winding pin and put it down into the thread race.
Draw the thread into the little notch


and pull it back toward the back of the machine. You may hear a little "click". Replace the bobbin cover.
Now, pulling gently on the TOP thread, use the handwheel to manually move the needle down and back up. As you pull gently on the top thread, you should bring up a little loop of the bobbin thread.
Pull this all the way clear so that you have two "tails" sticking out the back.

You're ready to sew!
Cleaning your machine is an important part of keeping it running well. Every so often (especially if you're working with a very fuzzy fabric) you need to remove the needle plate and clean out all the lint that builds up around the thread race. Most machines come with a little brush for this, but if you can't find yours, try a makeup brush.
Note: Always unplug your machine before performing any maintenance.

Take off the bobbin cover and remove the bobbin

Take out the screws holding the needle plate in place.

Remove the needle plate.

Using the lint brush, gently wipe all the fuzz and lint from the machinery underneath.

Replace everything.
Your machine also needs to be oiled periodically to keep it running its best. Anytime it starts to sound "loud", try oiling it. Your owners manual should have a page talking about "oil points". (If you can't find your manual, try taking it to your local dealer and asking them to show you where the oil points are.) Be sure to use sewing machine oil! This is a special lightweight oil -- WD-40 will not work! Always sew for a few minutes on scrap material after oiling, to clean away any oil that might have gotten on the needle plate, feed dogs, etc.
The last thing we need to talk about is one of the most overlooked, yet important, tools you use: the sewing machine needle. Using the right needle and a sharp needle makes the difference between a professional looking finished product and one that looks sloppy or "homemade". It can also make sewing much more frustrating, as a dull or wrong needle can keep your machine from working well. Using the wrong needle or a dull needle can cause your fabric to bunch, threads to pull, the sewing machine to malfunction, and give you an overall sloppy finished look. Needles should be replaced whenever
- the sewing machine is having problems (skipped stitches, poor tension)
- switching material (ex. denim to silk)
- after approximately 12 hours of sewing time
- it may have been damaged (hitting a pin, etc)
Here is a typical needle case.

The next line tells us the needle type. This refers to the tip of the needle. There are many, many different needle types but some of the most common are
- Universal -- the best choice for most basic sewing on woven fabrics
- Ballpoint/Stretch -- used for sewing on knits or stretchy fabrics. The needle has a rounded point to avoid piercing threads.
- Leather -- used for sewing leather. The needle has a cutting tip.
- Denim -- used for sewing denims and other heavyweight fabrics like canvas, duck cloth, etc.
- Microtex/Sharps -- used for microfibers, silk, heirloom sewing.
The number at the bottom is the needle size. This refers to the size of the shank. A smaller needle (60/8) would be used for a lighter fabric like georgette or organdy, larger needles (90/14) for heavy fabrics like denim or corduroy. Sizes range from 60/8 to 120/19, but for most fabrics you probably want about a 80/12 or a 90/14.

Feeling good about using your machine? Let's do some sewing!
No comments:
Post a Comment